Wednesday, February 24, 2010

Course III Tiered Cake

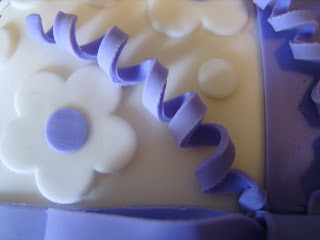
Here's my finale cake for course III!! Desipite the many many errors, I think it turned out really pretty. I'll confess the problems this cake has on the bottom in fine print. We can just pretend my cake is absolutely perfect :)


No, it's not your imagination...the bottom layer really IS a different color. I frosted the bottom layer with pink strawberry frosting. White fondant doesn't cover colored icing very well. Good to know.
I am pleased with the flowers, for the most part. However, I didn't close off the middle part with the petals very well so a lot of them are showing. Also I should have made the petals thinner.
Despite the course being called tiered and FONDANT, we really weren't taught how to put fondant on a round cake. Also I rolled the fondant out too thin. This cake has tears and bumps gallore.

Tuesday, February 23, 2010

More Flowers!

These flowers won't be on my finale cake; they're royal frosting flowers we learned last week in class. I just felt like sharing them cuz they're so pretty! My favorite flower to make is the Lilly. I'm excited to use it on my Easter cake.

Poinsettia


Peutnia


Morning Glory


Lilly

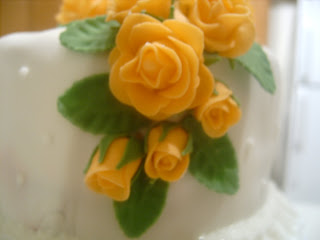
My Fondant Roses

I finally finished the roses for the finale course III cake! 38 roses + 38 septals + 30 leaves=a long time to make! I have my last class tonight and I'm excited to see how the finale cake turns out. These fondant roses take much longer than the Wilton roses but they are easier to learn and turn out prettier.
Putting the septal on


All of the roses!


Rose Buds


Pretty rose

Friday, February 19, 2010

Present Cake

I have to say this last cake for course III was probably the easiest and less stressful cake I have made as of yet. Have I mentioned I love working with fondant? Well, I love working with fondant! The results always come out neat, clean, and professional looking. As an added bonus, I can charge more for a cake with fondant, if I ever want to charge for my cakes.

Boo Michaels!

I just got back from Michael's who has this new policy to not accept more than one coupon of the same percentage. I had three coupons...two 50% off and one 40% off. I get to the checkout counter and the cashier says she can only take one of the 50% off coupons. How lame. Michael's, you've just lost yourself a costumer. I'll do my shopping at Joann's with my coupons from now on.

Mmmm....Fondant.....

For the rose (see previous post) we need to make the rose centers which are just little tear-drop dollops of fondant. This is what I found when I stupidly put them were my little boy can reach. I wasn't mad at him for eating them all; I thought it was really funny. I was relieved he didn't eat the completed rose that was with the rose centers.

Course III!!

As of now, I've been to 3 of the 4 classes for the Wilton course III class. We're learning how to do tiered and fondant cakes-and it's been so much fun!

The first week we learned how to do some pretty borders and string work. The second week we learned how to make the fondant rose. It's so much easier (but not necessarily quicker) than the buttercream rose. I plan to write a post on how to make the rose sometime later.

I'm going to stick with the fondant rose from now on if I'm using fondant on my cake. They are easier and they turn out really pretty:

Tuesday, February 16, 2010

Filling Tip

Here's a helpful tip for those of us (like myself) who are too lazy to make cake filling: Pudding Snacks!

They come in all sorts of favors. Two pudding cups work perfect for an 8"or 9" cake. Yummy and easy.


**I used fat-free Boston cream pudding and it didn't work out at all...the cake just absorbed it. Weird. But the regular ones worked just great. **

Monday, February 15, 2010

Chocolate Cherry Cake Recipe

Here's a cake recipe if you want to make a cute cake but just don't feel like taking out all your cake stuff and spending all that time decorating. I found it in a Better Homes and Garden magazine. It tastes wonderful! You'll need a cake leveler. They're not scary...I promise. They take pretty much no skill to use and cost under $5. What is good and bad about this recipe is that the cake absorbs the frosting like a sponge in over just a few hours. So the cake will look shrunken but it will be extra moist. Yum!

Chocolate Cherry Cake

Ingredients:

  • 3/4 cup plus 1 tsp. all-purpose flour
  • 1/3 cup plus 1 tsp. unsweetened cocoa powde r
  • 1 tsp. baking powder
  • 1/2 tsp. baking soda
  • 1/2 tsp. cinnamon
  • 1/4 tsp. salt
  • 1/3 cup butter, softened
  • 3/4 cup sugar
  • 2 eggs
  • 1 tsp. vanilla
  • 1/2 cup sour cream
  • 1 Recipe Cherry Frosting, recipe below

Directions

1. Preheat the oven to 350 degrees F. Grease two 6x2-inch round cake pans. Mix 1 teaspoon each flour and cocoa powder; dust pans. Set pans aside.

2. In bowl combine 3/4 cup flour, 1/3 cup cocoa powder, baking powder, baking soda, cinnamon, and salt; set aside.

3. In large bowl with electric mixer beat butter on medium to high for 30 seconds. Add sugar; beat until smooth and fluffy. Beat in eggs and vanilla until smooth. Beat in sour cream and flour mixture. Pour batter in pans; spread evenly.

4. Bake 22 to 26 minutes or until top springs back when lightly touched and edges begin to pull away from sides of pan. Cool in pans on wire rack 10 minutes. Remove from pans; cool on rack.

5. Use a cake leveler to horizontally cut cakes in half to make 4 layers total. Place bottom layer on plate; spread with 2/3 cup frosting. Repeat with layers. Place top layer on cake. Heap remaining frosting, swirling in peaks. Refrigerate. To serve, top with Chocolate-Dipped Cherries. Serves 8.

Cherry Frostng

In large mixing bowl combine one 8-ounce carton sour cream. 1 cup whipping cream (do not use ultra-pasteurized whipping cream), 1-1/2 cups powdered sugar, and 2 tablespoons maraschino cherry juice. Beat with chilled beaters on medium-high until fluffy, about 3 to 5 minutes.


Thursday, February 11, 2010

A Few Important Decorating Tips

The last few cakes I posted were quite hideous and I realize now it's because I didn't follow a few very important tips I'm about to bestow upon you (don't you feel special??) I hope my advise will keep your stress level to a minimum when you decorate your own cake.

  1. Keep your work space clutter-free. Maybe you don't have a problem with this, but many (including myself) do. You need a large area of free space when making and decorating cakes. Take the extra time to put back/throw away whatever you're finished working with. Doing this may just save your sanity so you're not tearing the kitchen apart looking for the decorating tip you just had...only to find that it was hiding behind the vanilla that you didn't bother to put back.
  2. Don't rush! Relax. It takes time and patience making a cake look cute. The only thing you'll gain from rushing is sloppy-looking work. Take your time and enjoy decorating! Which brings me to my next point:
  3. Leave enough time to work on your cake. Some people like to think they work better under pressure. Cake decorating will prove those people wrong. A sloppy cake is what they'll get and tardy is what they'll be.

Wednesday, February 10, 2010

Freaky-Deaky Duck

Yet another horrible cake. But in my defense, I made this cake to practice for my little guy's first birthday party in March, which is going to be duck-themed. I'd never made a 3-D cake before and I figured I ought to try it out beforehand. So glad I did! I followed the directions exactly and the duck came out lop-sided. I was really impatient while applying the stars so they didn't turn out too well. Plus it kept falling over so I figured it would look horrible anyway so I didn't really try to make it look cute.

So I've decided that I'm only going to make half the duck cake (it will be lying flat) for my little guy's b-day. Besides, a one year old doesn't need an entire cake for himself!

Speaking of cakes...I tried a new cake mix with this duck cake, butter pecan. It was nasty--it tasted like burned cake. Don't try that flavor...its so gross!
Quack! Aaarrrghh!

Raspberry Filling Recipe

Ingredients
  • 1 1/2 cups frozen raspberries

  • 1 tablespoon cornstarch

  • 2 tablespoons lemon juice

  • 1/4 cup sugar

Directions
  1. In a small saucepan, combine all of the ingredients and bring to a boil over medium-high heat.
  2. Let cool completely before spreading onto cake.

I think this filling with white cake are a good combination.

**This filling is very seedy. Some people like to boil the raspberries and then strain the seeds, but I'm waAaay too lazy for that. I didn't mind it too much with the seeds. I think the next best thing to do is buy seedless raspberry jam instead of frozen raspberries (which btw aren't very cheap). I haven't tested this filling recipe with seedless raspberry jam so try it at your own risk!**

    Ugliest Cake Ever

    This is probably the worst cake I've ever made. I obviously had no design plan whatsoever, and I also was in a hurry and forgot to level the cake. It don't even know what else to say about it. It's just plain ugly.


    Tuesday, February 9, 2010

    B-day Cake

    This next super cute cake I am very proud of. Mainly because I made it with virtually no cake supplies.

    I went Chicago visiting family for Christmas and I didn't bring any cake decorating supplies (whoops!). My sister's b-day is right after New Year's and I told her I would make her a cake. I had no cake leveler, but I did use I knife to level it--I'm surprised it worked so well! My mom had a pampered chef pastry decorator that I used for the shells and the heart lines---though the it was really bulky and awkward to work with. The decorations on the side and writing were made with marshmallow fondant. Oh and I also used a cookie cutter on the fondant for the hearts.

    FYI

    You oughta be signed up on Joanne's and Michael's mailing list as they are the main distributors of Wilton products. I pretty much don't buy any cake decorating item unless I have at least a 40% off coupon.

    And just FYI...if ever you are ever emailed a coupon from Joanne's or Michaels, you can print out 2 copies and use one at each store.

    Here's what I do to maximize my coupon use: I use one of the printed off coupons at Michael's. Most of the time they give me another 40% coupon with my receipt (Joanne's doesn't give out any coupons with the receipt). I then take the coupon I have just received from Michael's and the other copy of the coupon I got in my email and go to Joanne's to use them. Saves me lots of $$!

    Sunday, February 7, 2010

    Piano Recital Cake

    Back in November 2009 when I organized a piano recital for my students, I thought it would be cool if I could make a cake like this:


    Then I came to my senses and realized there was no way in heck I could pull a cake like this off. It simply was not possible, for my cake skills were (and still are) in their infancy.

    So I took an easier approach. My friend sent me a link on how to make this cake. So easy. I think it turned out okay, though nothing compared to the above cake. The problem with my cake is that it had no legs. It bugs me. A lot. But I do think the color flow keyboard and music really made the cake stand out.


    I also made some cute cupcakes with color flow notes and treble clefs.

    All set up!

    Strawberry Filling

    This is the filling I used to make the first Halloween cake. It's really light and fluffy. I would use this filling if you're planning on eating the cake right away, because the cake tends to absorb the cream.

    1 Cup Heavy Cream
    1/2 Cup Sugar
    1 Large Egg White, stiffly beaten
    1/2 Cup Strawberries, mashed I used frozen strawberries, but fresh will work just as well

    Whip cream until stiff, Fold in sugar, egg white, and strawberries.

    Saturday, February 6, 2010

    Birthday Cake


    I made this cake for my friend's birthday. I think it turned out pretty good, even though the writing was a bit squished. It was white cake and raspberry filling (so good!) with white store-bought frosting. FYI-purchased frosting spreads really easily, but that's probably because it's full of grease.

    My Ugly Wedding Cake

    So I was flipping through my wedding pictures the other day and I realized that I had an ugly wedding cake. That's what I get for cutting corners on the best day of my life (well, one of the best).

    I really wanted this certain cake from a cake professional in Zion, Illinios but I wanted to save a little $ so I found another "cake decorator" who said she could do the same thing as long as I gave her a picture of it and would do it for way cheaper. Big mistake! Not only did it look crappy (okay I'll admit the set up looks pretty) but she replaced a tier with Styrofoam instead of real cake (which we had specifically asked her not to do) and she tacked on an extra $50 for no apparent reason.


    Now that I know how a halfway decent rose looks, I shudder every time I see my wedding cake. Seriously, what the crap are those round things on the cake? I guess my ugly wedding cake left a great void in my life...therefore I am trying to fill it by learning how to decorate cakes.


    Friday, February 5, 2010

    Halloween Cake #2

    Here's a good example of what happens when you don't put enough powdered sugar in fondant. It turns out squishy and doesn't hold it's shape. I was also very rushed when I made this cake and accidentally chopped off a corner with the cake leveler. Whoops! I guess it turned out okay overall.

    *I used a pumpkin-shaped pan to make this cake.

    Marshmallow Fondant Recipe

    Here's the recipe for marshmallow fondant:

    1 Cup packed Mini Marshmallows
    1 Tbsp. Water
    1 3/4 Cup Sifted Powdered Sugar
    Food Coloring
    Vegetable Shortening

    Put Marshmallows in microwave safe bowl and add the water. Microwave for 45 seconds. Stir-It should look kind gloopy-soupy. Add food coloring, if desired. Add the sifted powdered sugar and mix/ fold. Cover your working surface and hands with the vegetable shortening. Knead until pliable but firm, like 3-5 minutes or so. Roll out to 1/4 of an inch.

    I like to double the recipe so I can be sure I have enough to cover the entire cake, especially if I place the fondant on the cake askew.

    Make sure to sift your powdered sugar so you don't get little hard balls! I have to learn everything the hard way. I got little hard balls in the fondant and it was a pain in the butt to scrape each one out. Don't forget to sift!

    Also feel free to use as much vegetable shortening as you feel is necessary. Nobody eats fondant anyway. Though I have heard this particular fondant is more tasty than regular fondant. With that said, I'm pretty sure I'll pass on trying regular fondant, thankyouverymuch.

    Halloween Cake #1

    If you haven't noticed already, I tend to get ahead of myself (for example trying to decorate a cake with basically no knowledge or skill on how to do so). Well, I did it again, but this time with fairly decent results. I tried working with fondant without any know-how.

    I found a recipe for marshmallow fondant (I'll post it later) and just went at it. It was pretty cheap and easy to make--and really fun to work with. It turned out more tidy-looking then just the buttercream frosting. Plus I didn't have to spend the time and energy trying to get the buttercream to look as perfect as possible. I just rolled the fondant out and plopped it on the cake. And then I smoothed and cut off the excess, of course.

    A few days before assembling the cake I made some cute skull and bones with color flow icing. So easy. And super easy to put together. I'm also fond of my lettering on the cake. I really like this cake. It was chocolate with strawberry cream filling. Yum!


    Decorating Tip #2

    They don't teach you this in the Wilton classes, but did you know that if you add some clear corn syrup to your "real" buttercream icing (the icing I use to frost my entire cake with) it makes it very smooth and easy to spread? It does! Try it! I'm not sure of the exact measurement. Just add enough to make it glossy and smooth. Obviously don't go overboard with it.

    Royal Icing/Color Flow Recipe

    Here's the recipe for Royal Icing:

    3 Tablespoons of Meringue Powder (you definitely need it this time)
    4 Cups of sifted powdered sugar (always sift!)
    5-7 tablespoons of warm water (I don't know why it needs to be warm though)

    Blend powdered sugar and meringue powder in a bowl. Add the water and mix for 7-10 minutes on medium-low speed until icing is no longer glossy.

    You'll definitely want to use an electric hand mixer for this icing. It doesn't make much bubbles and if it does, the bubbles come out easy. 7-10 minutes is a long time to blend!

    **Make sure to cover your icing with a damp cloth while your are working with it. Though it may take a few days to fully harden, it will crust fairly quickly**


    For Color Flow Icing, just add more water!

    Add a little bit of water at a time. You'll know when you have just enough when you can drizzle a little bit of icing from a spoon and it takes it about 10 seconds for it to disappear back into the rest of the icing.

    Thursday, February 4, 2010

    Course II

    Course II was so much fun! I didn't plan on taking it but then I found out it was half off at Michaels and I'm very glad I took it. We mainly worked with royal icing. It's basically sugar and water (I'll post the recipe later) but it's pretty much inedible because it's rock hard when dry. But you can make flowers that can hold their own without falling apart. My new favorite flower to make is the daisy--they're super cute and super easy--though I haven't quite perfected them yet. The good and bad thing about royal icing flowers is that you have/get to make them a few days in advance.

    We also learned color flow, which is basically the same recipe as royal icing despite the fact Wilton has a separate recipe using color flow mix (c'mon Wilton, we all know you're just trying to make more $!) but I just add more water and the recipe works perfectly fine. Color flow is awesome because you can do just about anything with it-including 3-D items, like butterflies.

    Last but not least, we learned the rope border and the basket weave technique. They are both not hard. Basket weave looks complicated and difficult, but its really fairly easy once you get the hang of it. Not bad at all. Plus it looks way cool.

    Anyway, here's my finale cake. My best work I think.


    Wilton "buttercream" frosting Recipe

    Okay here's the Wilton recipe for "buttercream" frosting. There is no butter involved...instead its shortening -- aka lard. Wilton would have you frost your entire cake with it. Which is fine if you're not planning on eating it. However, most people like to eat the cakes they make-and I would never eat a cake frosted with this frosting. I think the lard makes it disgusting. Bleech.

    I always frost the entire cake in real buttercream
    (see previous post for recipe).

    I use this recipe only for decorations. Roses, borders, writing, etc., not only because its easier to work with but also because Crisco is cheaper and easier than using butter and it lasts longer, a plus if you like to make your roses ahead of time:

    1 Cup solid white vegetable shortening
    1 teaspoon vanilla or other flavoring
    2 Tablespoons of water (more if need/wanted--this is thick consistency recipe)
    4 Cups of powdered sugar
    1 tablespoon of meringue powder-its not a big deal to skip, but I guess it helps stabilize the frosting. I haven't noticed much difference using. Plus meringue powder isn't that cheap.

    Cream shortening, flavoring and water. Add rest of ingredients and mix until creamy.

    Tip: Mixing with a hand mixer may seem quicker, but it causes air bubbles which you do not want. Air bubbles cause major problems. Just hand mix if you are just doing one batch. It will save you the time of going through and smoothing the air bubbles out with a spatula and saving the annoyance of whatever problems may come from the air bubbles (trust me, you'll have problems!). So in the end hand mixing is actually faster (who would have thought!).

    Wednesday, February 3, 2010

    Wilton Course I Finale Cake

    One of the most difficult things for me to learn was the rose. Not only do you need the right frosting consistency, you also need to hold you bag at the right angle and at the right spot. All while you are moving the the flower nail between your fingers with your other hand clockwise. And you need to do ALL of this going at a fairly fast and even speed.

    The Wilton rose is hard!

    The very last class of course one we were suppossed to bring a cake so we could decorate it there using what we learned from the course-including the rose. I made a cake and frosted it (btw, I'm very proud the frosting job on this cake. It's chocolate and you don't see a single chocolate crumb, do you??) but I didn't bring it. The reason being because I knew I was a failure when it came to making the rose.

    So the entire class time I worked on the rose and the rose alone. It took me about 20 tries, not kidding, to get something that even resembled a rose. It took me another 20 tries to get a fairly decent looking rose. At I'm sure it will take me another 50 tries to get a perfect rose. But by then I'm pretty sure I'll have carpal tunnel syndrome. Or be dead. Whichever comes first.

    Decorating Tip #1

    The instructors probably tell you this is class, but it helps SO much to use a bit of water when frosting your cake. Dip your spatula in water, shake off the excess, and frost away. So easy and so helpful!

    However, Don't use too much water, or you'll end of with slimy frosting that gloops off your cake.

    Yep. I have to learn everything the hard way.

    Wilton Course I Cake

    Back in August 2009 I got a friend to take the first Wilton course with me. Wow did I ever learn a lot! And buy a lot...Cake decorating is expensive!

    I learned of the existence of cake levelers-a necessity if you don't want your cake to topple over. I also learned how to frost a cake, what tip is what, etc...I'd probably bore you if I listed everything I learned!

    Needless to say this cake looks miles better than my other cakes, granted it's far from perfect. I got a bit impatient with the writing but I'm pretty proud of the rainbow. We had the choice to make this cake or a teddy bear cake. I would of had buy the cake pan for the bear cake and I'm cheap so I did the rainbow cake instead. This would have been a great cake for a coming out party! J/k. It's a cute cake for my little Gabe.